THIS POST MAY CONTAIN AFFILIATE LINKS. PLEASE READ MY DISCLOSURE FOR MORE INFO.
 More often than I expected, I get asked, “How did you start the blog?” In retrospect, I totally get it. I had no idea how to start one either. Initially, I relied heavily on my husband, the Facebook marketer and savvy internet navigator. While that was fun and all (sarcasm), it wasn’t without some serious impatience (truth). I’m a notetaker, so I organized my notes into a step-by-step guide for my friends (and now no one else will have to deal with flared nostrils and tapping fingers).
I’m going to start with WHY I started a blog… [Skip to about halfway down for the Step-By-Step How-To]
One quick thing first… please allow me to wax philosophic for a hot minute. ![]()
![]() I wasn’t at all sold on the idea of writing a blog myself. First and foremost, I’m not a writer. That makes the idea of writing something that will be available on the wilds of the internet… challenging.
I wasn’t at all sold on the idea of writing a blog myself. First and foremost, I’m not a writer. That makes the idea of writing something that will be available on the wilds of the internet… challenging.
Reason 1 to write a blog: It took me awhile to get here… everyone is a writer. Do you know how to write? Do you have thoughts? Those are the only 2 requirements to being a writer. Start writing. Your style will emerge. Practice makes better. Just start.
Coming from… let’s call it…. a rabidly private lifestyle, this idea of being public with some aspects of our life (example: my kids’ faces) was scary. I talked myself into trying it for 3 reasons: Grandmom, Grammie Denise and Grandpa Mike (Grandad has passed on or he would be on the list too).
Reason 2 to write a blog: A blog is a great way to give your VIPs, whoever they may be, an opportunity to be a part of your life. It’s part of the social contract you make with those you love. No matter the topic, a blog is a reflection of your personality and how you spend your time. It’s an incredible vehicle to build a community and to give your tribe a way to participate on your terms. Unfortunately for our families, DRD4 happened. It’s the gene that compels some people to be travelers. The blog is our connection.
There’s a real opportunity to make money.
Reason 3 to write a blog: Money. Awesome!
While cleaning out my inbox, I found 3 or 4 of my dad’s old emails. I sent them to my mom and brother. We laughed and laughed. We could hear his voice in the way he wrote. My husband even learned where a few of my personality quirks originated. It was such a gift. What if…. somewhere down the road…. the kids (or my future grandkids) could be comforted like that after I’m long gone?
Reason 4 to write a blog: The blog is a new kind of oral history. Some day blogs will be read by historians to help them understand what it was like to live in 2017. Your family might read it to get to know you better or build on your ideas. Generations are now going to have access to our stories, our pictures, our thoughts and our life lessons – they’re actually going to know us (warts and all).
I sincerely encourage you to consider starting your own blog. If you don’t want anyone to find it, you can make it unfindable for the general public. You can write it only for yourself (like a journal) or you can password protect it so you know who sees it.
[thrive_custom_box title=”Tips” style=”light” type=”color” color=”#c6c6c6″ border=”#1e73be”]
- Write in your everyday voice.
- Include pictures if you like them, or don’t.
- Don’t worry about perfect. Aim for ‘good enough’.
- Wait a day or 2. Reread your work. Fix it up. Hit publish.
- Maybe just try a “No Thank You Bite” before you decide it’s not for you. [/thrive_custom_box]
Ok… soapbox stowed for take off.
How To Start Your Own Blog On WordPress
Step 1: Turn on your computer, open your favorite browser
Step 2: Decide Where Your Website Lives
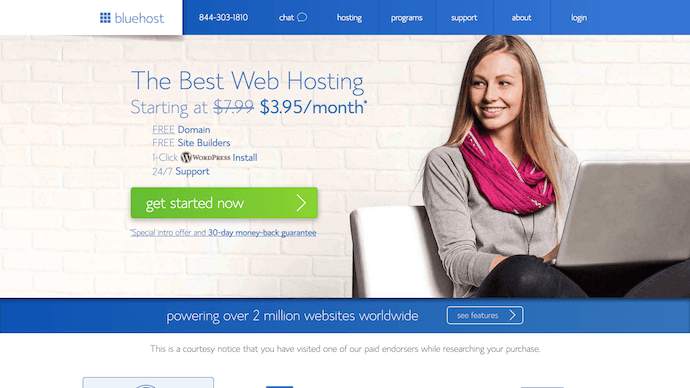
You can run your own server which will allow you to host your website. That’s a bridge too far for me. It’s a “pass”. Instead, I choose to rent space on a commercial server. Specifically, for most of my online experience, we used Bluehost. It’s straightforward to use and a good bargain. They also have a lot of experience with blogs so they’ve been able to quickly answer any question that I’ve had come up.

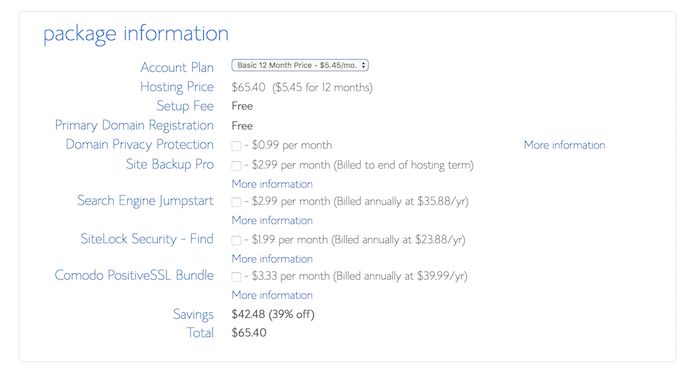
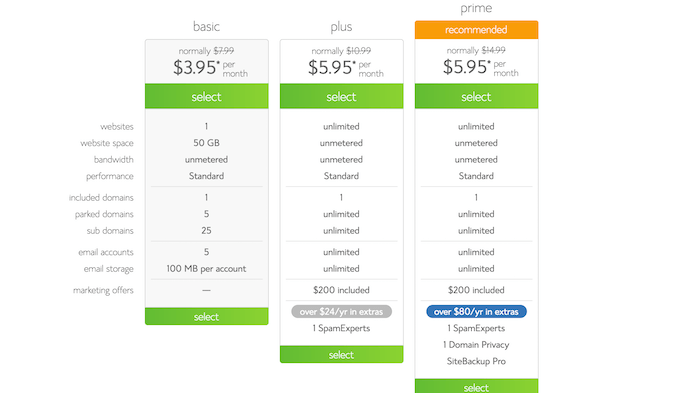
- To get the cheapest start you want to choose the “Basic” plan. This is really all you need to get started.
- Hosting is only $3.95 a month if you use my link if you sign up for 36 months (payment due upfront).
- You get a free domain name when you sign up for 12 months or more so that is a good savings up front!
- One thing you may want to consider is Domain Privacy Protection. At $0.99 a month, if it’s important to you, it’s worth it. It keeps your personal information off the record for the domain.
- Other than the domain and hosting you don’t need any of the other options that Bluehost sells. You can uncheck those.
[thrive_custom_box title=”Step-By-Step” style=”light” type=”color” color=”#bcbcbc” border=”#1e73be”]
- Go to Bluehost and click “Get Started Now” button. Choose the package you are interested in
- Enter your new domain name (or one you previously purchased).
- Enter your personal and payment information.
- Next, you will have to create a password. Make sure it’s a secure password [/thrive_custom_box]
Set 3: The Domain Name – Pick Your Name
You get a free domain name directly from Bluehost as part of the hosting process. Normally, domains cost anywhere from cents on the dollar to $1000+. If you buy one year of hosting up front, you can pick an available domain (i.e. not one owned by someone else who may or may not be trying to sell it for a ridiculous profit).
Using this link, you get the best pricing available and a FREE domain name to get started. Again, because you have no traffic yet and are just getting started, the “Basic” package is all I recommend and all you need for now.
Eventually, we had to upgrade to Knownhost Hosting after being with happy with Bluehost for years. Knownhost is a substantially more costly plan designed for very high traffic. I would not start with it but if you want more information or our perspective, shoot me a quick email.
Step 4: Connect Your Hosting and Your Domain Name
You can skip this section if you get a domain name directly from Bluehost.
If you’ve already purchased a domain from another company like GoDaddy you can use their resource pages to make sure the domain is correctly configured correctly.
Step 5: Install WordPress On Your Bluehost Server
(It’s way simpler than it sounds)
If you have your hosting and are ready to get started, read on. If you don’t have a domain and hosting yet, click here to go grab a great deal at Bluehost and then return.
This part really isn’t difficult at all. Bluehost makes it really simple once you get started. On top of that, the WordPress blog platform is FREE. (cool, right!)
[thrive_custom_box title=”Step-By-Step” style=”light” type=”color” color=”#c6c6c6″ border=”#1e73be”]
- Once you receive your login information, go ahead and log into your Bluehost account. Find your way to you “C-Panel” (control panel).
- Look for the icon that says “1-Click Install”.
- Then click on the icon that says “WordPress”.
- Select the domain you want to install WordPress. (If you purchased through Bluehost, the domain will automatically appear.)
- During the installation, you will see “Advanced Options”. This is where you choose your login information for the blog. Choose admin names and passwords. Do not use simple words like”admin” or “password123” because these are easy to hack. Come up with an origional combination of words, capital and lower case letters and symbols that you will recall.
- Check the “Create New Database For This Installation”.
- Click “Install Now”.
- Remember to save your username and password somewhere safe.[/thrive_custom_box]
Congratulations!! You now have your own WordPress blog!
If you have questions, click the “Message Us” button and it will open a Facebook Messanger chat with us. We will try to answer your questions as soon and as well as we can!


